Ready to ring in the season with nails that shine in every Christmas photo? These five nail ideas strike the perfect balance between festive and chic, so you’ll look polished whether you’re heading to a candlelit dinner, gifting goodies, or streaming holiday classics at home. Each design is crafted to be doable in under an hour with common supplies, yet bold enough to stand out in your holiday selfies. Scroll through, pick your vibe, and save the step-by-step guide for later.
Tip: for best results, prep your nails with a clean base and use a strong top coat to ensure longevity. If you’re sharing your look online, consider shooting with warm lighting to enhance the metallics and glitter.
1) Classic Red with Gold Foil and a Snowflake Accent

Timeless red nails get a festive upgrade with delicate gold foil accents and a snowy accent nail. It’s elegant, eye-catching, and photograph-ready in any lighting.

What you’ll need
- Red cremes or gels (long-lasting if you manicure with gel base)
- Gold foil or gold foil flakes
- White nail polish or stamping polish
- Thin nail art brush or stamping plate for snowflakes
- Top coat (glossy or gel finish)
Steps to achieve
- Prep nails: shape, buff, and push back cuticles. Apply a thin base coat and cure if using gel.
- Apply two coats of red polish, curing between coats if using gel.
- Seal the thumb, index, or middle nail with foil: press small sheets of gold foil onto a still-wet red layer, then press and smooth.
- Paint or stamp a simple white snowflake on the accent nail. You can also use a white dotting tool to create a snowflake pattern.
- Finish with a thick top coat to lock in the foil and snowflakes. Cure if needed.
Pro tips
Use foil glue or a tacky layer to help foil adherence. Foil tends to look best on a smooth base, so ensure proper base color and finish before applying.
Why this works for holidays
- Classic red is universally festive and flattering on all skin tones.
- Gold adds festive sparkle without overpowering the look.
- A single snowflake accent nail adds a seasonal touch without feeling overdone.
Internal link idea: Pair this design with a quick tutorial on red nails for the holidays: How to Paint Classic Red Nails.
2) Snowy White French with Silver Glitter Tips

A modern twist on a timeless manicure, this snowy white French with silver glitter tips feels chic, fresh, and festive. It reads wintry in photos yet remains sophisticated enough for any holiday gathering.

What you’ll need
- White nail polish or gel
- Silver glitter polish or glitter top coat
- Fine nail art brush or French tip guides
- Top coat (matte or gloss)
Steps to achieve
- Prepare nails and apply base coat.
- Paint a clean white base on all nails; cure or let dry thoroughly.
- Create a curved white tip or use French tip guides for precision.
- Paint or brush on a thin line of silver glitter along the tips, or apply glitter polish to the tips and seal with top coat.
- Finish with a top coat for shine and longevity.
Pro tips
For a softer look, use a sheer white instead of a fully opaque white. A matte top coat on the white portion can look elegant against the glitter.
Why it works for holidays
- Wintery white is a classic palette for Christmas styling.
- Silver accents catch light beautifully in photos and candlelight.
- Easy to customize: keep all nails white or make one or two an accent color.
Internal link idea: Explore more French manicure twists for the holidays: Festive French Manicures Ideas.
3) Emerald Green Marble with Holly Rhinestones

Rich emerald green serves as a lush holiday base, elevated with marble swirls and a row of tiny holly rhinestones. This design feels luxe, yet approachable with a few simple tools.

What you’ll need
- Emerald green nail polish (or gel)
- White and black polish for marble effect
- Fine detail brush or toothpick
- Small green rhinestones or holly-shaped gems
- Top coat (clear)
Steps to achieve
- Apply base coat and two coats of emerald green. Let dry.
- On a separate surface, place a few drops of white and black on a small plate; swirl with a brush to create marble texture.
- Using the fine brush, apply the marble pattern to the nail while the base is still tacky, then cure or let dry.
- Place the holly rhinestones along the cuticle line of one or two nails for a festive accent; secure with a small amount of clear top coat or rhinestone gel.
- Finish with a top coat to seal the design.
Pro tips
Marble looks best when you don’t over-swipe—keep it light and organic for a natural footer of veins in the green base.
Why it works for holidays
- Emerald green feels rich and festive, matching evergreen decor.
- Marble adds texture and depth that photographs beautifully.
- Rhinestones offer holiday sparkle without too much glitter overload.
Internal link idea: See more marble nail tutorials: Marble Nail Tutorials for the Holidays.
4) Chrome Gold Gradient with Red Accent Nail
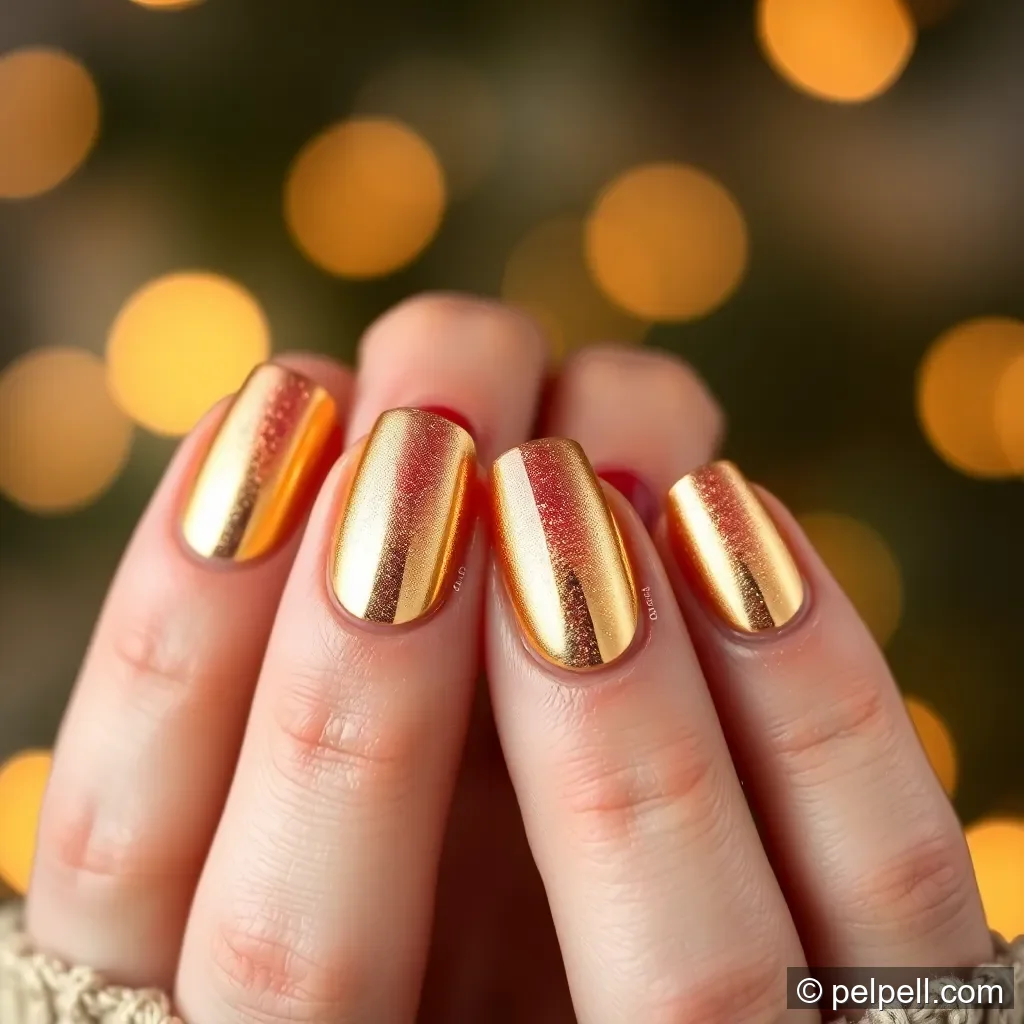
Think bold metallic meets festive red—this chrome gold gradient design creates a mirror finish that catches every twinkling light. The single red accent nail anchors the look with a pop of classic holiday color.

What you’ll need
- Gold chrome polish or chrome powder (with base coat)
- Red accent nail polish or gel
- Top coat (glossy)
- Small makeup sponge for gradient effect
Steps to achieve
- Prep nails and apply base coat. If using gel, cure between steps.
- Apply a neutral base color on all nails as needed for chrome powder adherence.
- Use a sponge to dab gold chrome powder across the nails in a gradient from tip to middle, leaving a few nails with full coverage and others with lighter shimmer.
- Paint one nail in a bold red as an accent, then seal all nails with a top coat.
- Option: add a thin line of red along the cuticle on the red nail or a small gold accent near the tip for extra flair.
Pro tips
Chrome powders can be messy; protect surrounding skin with tape or a decorative stencils, and wipe residue with rubbing alcohol after curing.
Why it works for holidays
- Chrome gold looks luxe and modern for holiday photos.
- The red accent nail nods to traditional Christmas color schemes.
- The gradient adds movement and visual interest without being loud.
Internal link idea: Learn how to apply chrome powder like a pro: How to Use Chrome Nail Powder.
5) Candy Cane Stripes with Matte Finish

Bright red and white stripes evoke classic candy canes, but the matte finish renders this look sophisticated and stylish. It’s playful, photogenic, and surprisingly easy to recreate.

What you’ll need
- Red and white nail polishes (or gel)
- Striping brush or a fine brush for neat lines
- Matte top coat
Steps to achieve
- Prepare nails and apply base coat; paint all nails with white as the base color and let dry.
- Using a striping brush, paint diagonal red stripes on each nail. Alternate with white stripes to mimic a candy cane pattern.
- Seal with a matte top coat to dull the shine and emphasize the stripe lines.
- Optionally add a thin clear top coat on a few nails to create a mixed finish (matte and gloss) for variety.
Pro tips
If steady hands are a challenge, use nail striping tape to create clean red and white lines, then remove the tape to reveal sharp stripes, and finish with matte top coat.
Why it works for holidays
- Candy cane stripes are instantly recognizable as Christmas symbols.
- The matte finish modernizes the classic look while reducing glare in photos.
- Easy to customize with different nail lengths and shapes.
Internal link idea: Explore other candy-cane inspired nails: Candy Cane Nail Art Ideas.
Wrapping it all together
With these five designs, you’ve got a full deck of options to match any Christmas Eve mood—from timeless and elegant to bold and modern. Whether you prefer a glittering metallic finish, a wintry white, or a playful candy-cane stripe, these tutorials are built for quick results and camera-ready results.
Want more holiday nail inspo? Check out these quick resources:
- Top Holiday Nail Looks of the Season
- Nail Art Tips for Long-Lasting Holiday Manicures
- Nail Care During the Holidays
We’d love to see which design you try! Share your photos in the comments or tag us on social with your nail looks. If you want, tell us which design you’d like to see expanded into a full video tutorial, and we’ll cover it in an upcoming post.
Conclusion
Five festive, approachable ideas to elevate your holiday style without a ton of time. Whether you go classic with red and gold, stay wintry with white and silver, or go bold with chrome and red accents, your nails will be ready for every Christmas Eve moment—from cozy nights in to glamorous gatherings. Pick your favorite, follow the steps, and enjoy nails that sparkle as brightly as the season itself.