As Christmas Eve approaches, the right manicure can elevate your festive look. Below are five Christmas Eve nails that cover classic holiday vibes and modern twists. Each design includes a simple shopping list and step-by-step directions so you can recreate them at home or with your favorite salon. Rich with texture, shimmer, and holiday motifs, these looks are designed to be both stunning and achievable, perfect for holiday photos and family gatherings.
Whether you love timeless red and white, glittery accents, or cozy knit-inspired patterns, you’ll find a design here that fits your mood and skill level. Read on for five Christmas Eve nails that will make your hands the star of the season.
Candy Cane Stripes: Classic Christmas Eve Nails

This design channels the iconic candy cane motif—red and white stripes that feel festive without being overpowering. It pairs beautifully with red dresses, green accessories, or neutral outfits to keep the focus on the nails.
- What you’ll need: White and red nail polish, base coat, top coat, striping brush or thin nail art brush, striping tape or nail vinyls, acetone and small brush for cleanup.
- Steps:
- Prep nails with a base coat to protect the nail bed.
- Paint a white base on all nails, allowing it to dry completely.
- Apply striping tape to create slim vertical or curved stripes, then paint red over the tape. Carefully remove the tape before the red dries to avoid smudging.
- Clean up edges with a small brush dipped in acetone for crisp lines. Apply a top coat to seal the design and prevent chipping.
- Pro tips: Use a thin brush for tiny details and wait for a fully dry base before placing tape to prevent color bleed. If stripes aren’t perfect, touch up with a white polish after removing tape for a cleaner edge.
Snowflake Glitter Gradient

Snowflakes meet glitter in this frosted gradient design. A deep blue or navy base with white glitter creates a wintry mood, while delicate snowflakes add an extra festive touch that photographs beautifully in holiday lights.
- What you’ll need: Navy or royal blue polish, white glitter polish or chunky white glitter, clear top coat, base coat, makeup sponge, white nail art pen or decals, optional rhinestones for extra sparkle.
- Steps:
- Apply a base coat, then paint nails with the deep blue base color. Let dry completely.
- Using a makeup sponge, dab white glitter from the tip toward the middle to create a gradient. Build opacity with 2–3 light layers, allowing drying time between applications.
- Add delicate snowflakes with a white nail art pen or decals on one or two accent nails. Optional: place a small rhinestone at the center of a snowflake.
- Finish with a clear top coat to lock in the glitter and give a glassy finish.
- Pro tips: Tap the sponge lightly to avoid applying too much glitter in one spot. If you don’t have decals, hand-paint tiny snowflake shapes using a fine brush for a personalized look.
Emerald Green with Gold Foil Accent

For a luxurious, holiday-glam look, emerald green nails with a touch of gold foil deliver holiday opulence without overdoing it. This design works with formal attire or party outfits while staying on-trend with metallic accents.
- What you’ll need: Emerald green polish, gold foil sheets or gold foil tape, base coat, top coat, tweezers or a nail foil applicator, thin brush (optional for detailing).
- Steps:
- Paint nails with emerald green and let them dry completely.
- Place small gold foil pieces near the cuticles, at the tips, or in a subtle diagonal accent. Use tweezers to position foil pieces and press gently to adhere.
- Seal with a generous top coat to smooth the foil edges and prevent lifting.
- Optionally add a tiny rhinestone at the base of one nail for a centerpiece.
- Pro tips: Foil adheres best to a slightly tacky surface, so you can skip foil glue if your top coat is still a touch sticky. For a gentler look, place a few larger foil patches instead of covering the entire nail.
Nordic Knit Pattern: Cozy Holiday Knit on Nails
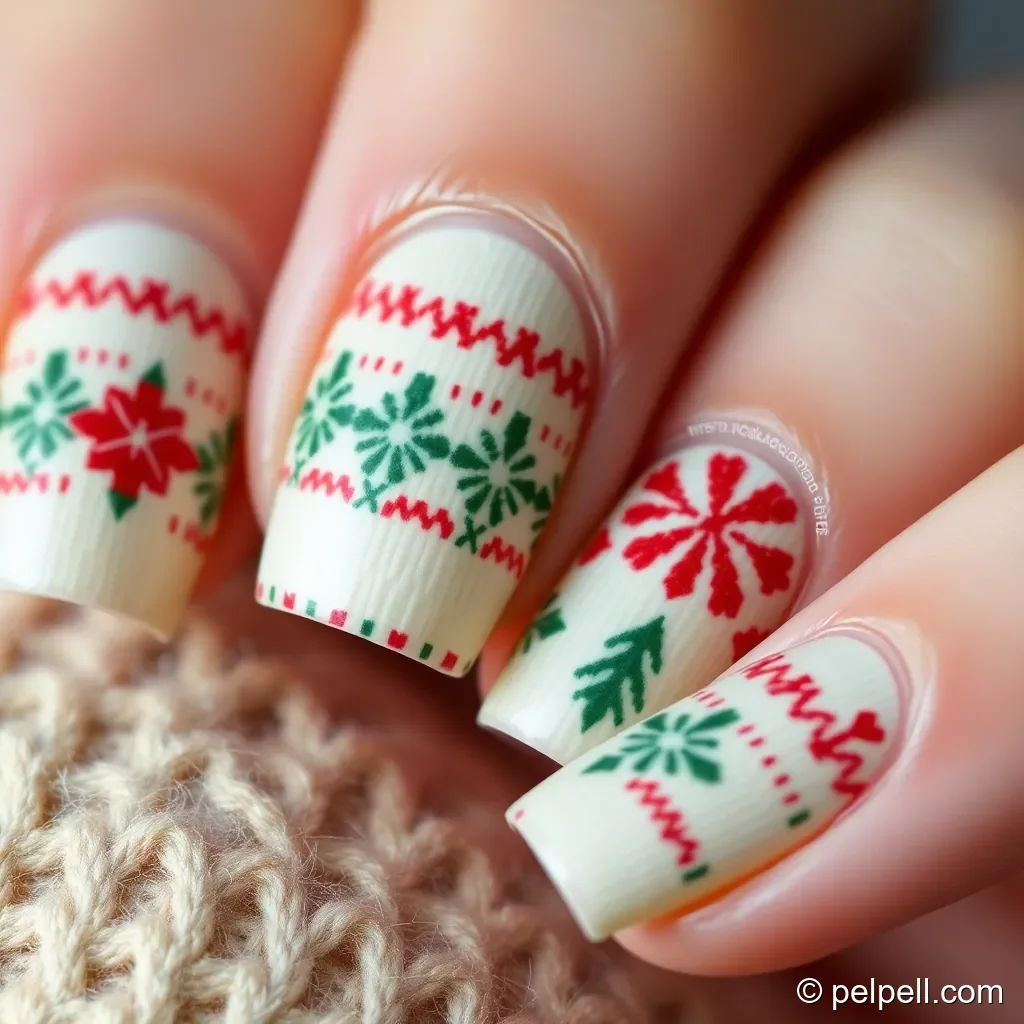
Inspired by festive sweaters, Nordic knit nails mimic the look of tiny stitches and geometric patterns. This design is perfect for those who love a soft, cozy aesthetic and a chance to get creative with a thin brush and simple motifs.
- What you’ll need: Neutral base color (cream, pale gray, or soft taupe), main accent color (red, forest green, or black), thin striping brush or nail art brush, dotting tool, base coat, top coat, optional matte top coat for a cozy finish.
- Steps:
- Paint base color and let dry. You can do all nails or reserve the knit pattern for an accent nail.
- On the accent nail, lightly sketch a simple knit motif: a few chevrons, diamonds, or ladder-like lines. Use the dotting tool for tiny stitches and a thin brush for crisp lines.
- Repeat the motif around the nail to suggest a repeating knit pattern. Add a second color if you want contrast.
- Finish with a glossy or matte top coat, depending on your preferred texture.
- Pro tips: Practice the pattern on a sheet of paper first to ensure symmetry. Keep lines thin for a delicate knit look, and use negative space around the design to enhance the motif.
Poinsettia Accent Nail: Elegant Flower Detail
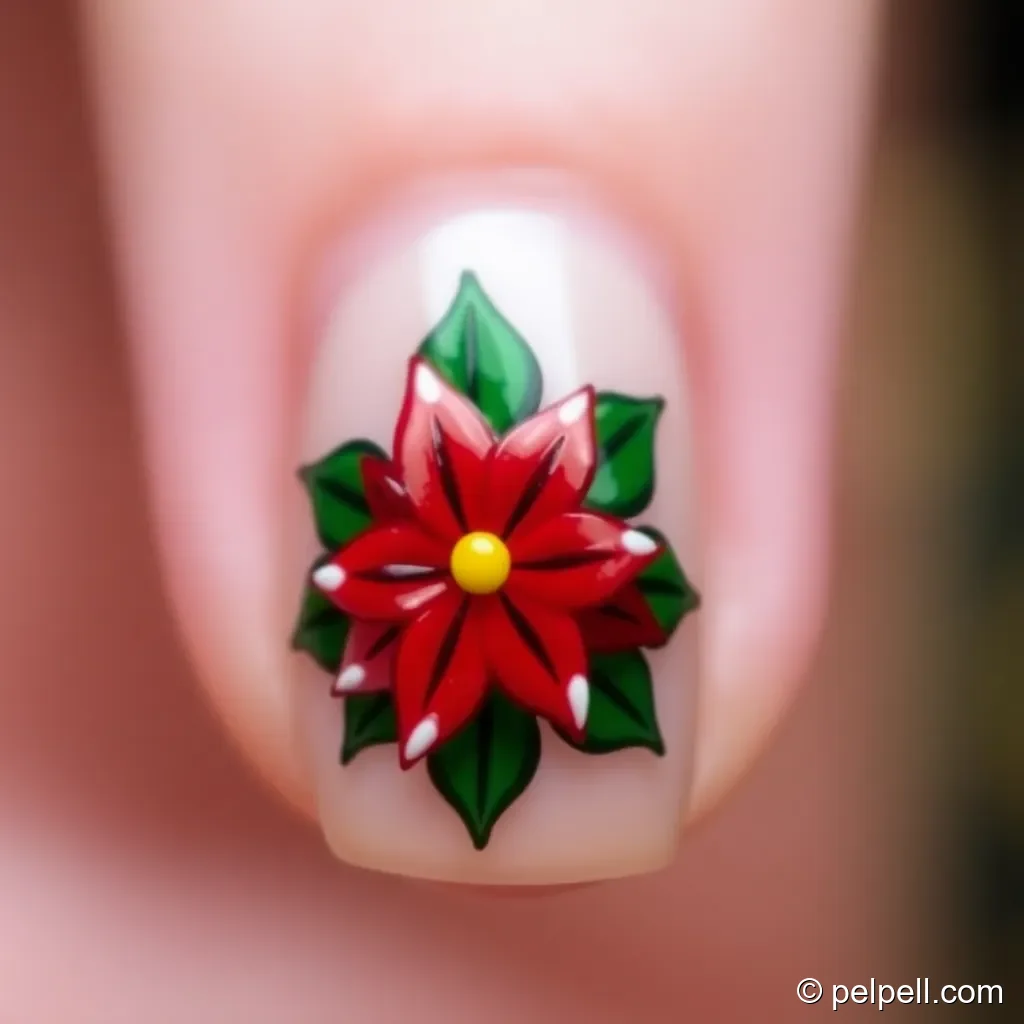
Poinsettias are a hallmark of Christmas decor. A single accent nail featuring a red poinsettia surrounded by green leaves looks sophisticated and festive, ideal for holiday gatherings and photos without overwhelming the entire manicure.
- What you’ll need: Red and green polish, white or pale pink for petal highlights, yellow polish or dot for the center, thin nail art brush or striping brush, dotting tool, base coat, top coat.
- Steps:
- Paint all nails with your chosen base color and allow to dry. Leave the accent nail as the main feature with a neutral or soft base to highlight the flower.
- On the accent nail, outline five or six red petals in a circular arrangement, letting the petals slightly overlap toward the center. Use a small brush for precise teardrop shapes.
- Paint small green leaves around the petals and add a tiny yellow dot in the center of the flower.
- Finish with a clear top coat to seal the design and ensure longevity.
- Pro tips: Use a steady hand and build the petals in layers for depth. If you prefer a more subtle look, use a pink or white petal color instead of red or add a delicate white outline around the petals.
Conclusion

Five Christmas Eve nails offer a spectrum of festive vibes—from classic candy cane stripes to glittery snowflakes, luxe gold foil accents, cozy knit patterns, and a refined poinsettia accent. Each design is designed to be approachable, with clear supplies and simple steps you can follow at home or take to your favorite nail technician. Whether you’re shooting photos for the holidays, attending a family gathering, or enjoying a quiet Christmas Eve at home, these nail ideas help you express your holiday spirit in style. Try one design, or mix and match across your nails for a truly personalized Christmas manicure.
If you recreate any of these looks, feel free to share a photo in the comments or tag us on social media. Happy holidays and have a dazzling Christmas Eve!